How-To: Make Redscale Film
Update: You can now simply buy ready-made redscale film.
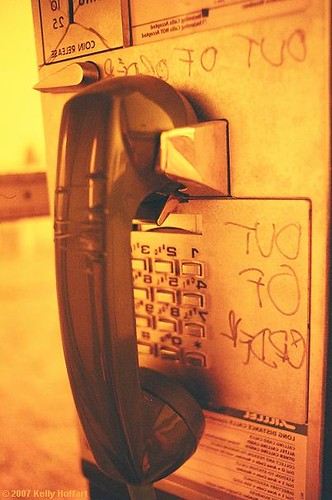
Here's something completely different for you to try, if you like, and it can only be done with film. Sure, you could fake it in Photoshop, but that would take all the fun out of it. It's part of the whole lo-fi movement, which I'll talk about another day. This particular technique is called redscale, and the results look like this:
In its simplest terms, this happens because you put the film in the canister with the wrong side facing up, so the wrong side gets exposed. It sounds kind of intimidating to anyone without any darkroom experience, but it's really quite easy, and I'll walk you through it. All you need is two rolls of film, some clear tape, and a pair of scissors.

Step one: take a roll of film, and pull all the film out of it--but don't yank it too hard. You want to leave it attached to the spool. Then snip it with some scissors, leaving just a little bit, and throw away the exposed film.

Step two: get your second roll of film, and cut off the leader.


Step three: tape the two rolls together, but with opposite sides of film facing up.

Step four: roll the film into the other (the first) spool. Using your scissors might be a good way to do this. And make sure to do it in complete darkness.
Step--oh, wait, I suppose maybe you can't see what's going on in that completely dark room. Here's what it would look like in the light:

When you feel a bit more resistance, you can stop and come out into the light.

Step five: pull the spools apart a bit, so the film isn't stuck inside. Cut it off close to the now-empty spool, being careful to leave just enough so you can use this one as your empty spool next time. Put it in an empty film canister and label it, then put it somewhere you can find it next time.

Step six: cut a new leader into your new roll of redscale film, and voila! There you have it!
Now, one thing to keep in mind is that you might want to overexpose everything by one stop. Other than that, there's nothing different about shooting it. When you take it in to get developed, make sure to tell them about the tape, so it doesn't gum up their machines. Another thing to think about is that different kinds of film and different lighting conditions will yield somewhat different results, ranging from a very much maroon tint to a strong yellow.
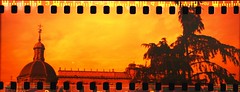
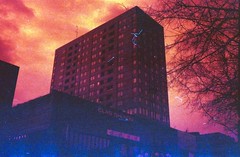
So what are you waiting for? Oh, I suppose maybe you want to see more results. Here is what some other people have done:

(by sterile)
(by fimdalinha, who was also using a film spoke technique, caused by using 35mm film in a modified medium format camera)
(by trxonspeed)
For even more, you can check out the Redscale Film group on Flickr, but be warned--they don't accept imitations: you must do it with real redscale film, not with digital manipulation.
posted by Full Metal Attorney @ 1:20 AM
67 comments
![]()

